
Learning how to make a reflection in Photoshop is a great way to make product photos look lifelike. With a few simple steps, you can put your product on a dramatically reflective glass; a few more steps, and you can create the illusion that your product is sitting in a clear pool of water.
Receive free ecommerce & product photography tips
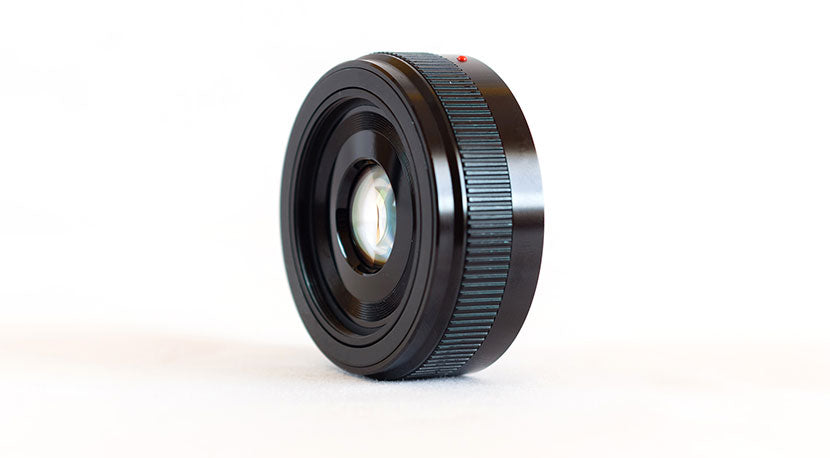
For the Photoshop tutorial below, use a photo that features the product at eye-level, like the image of the lens below. This’ll make creating a reflection an easy process, as compared to creating a reflection of an angled object, which is way more tedious and complicated. If the product is shot against a white background, that process is even easier.
How to reflect or draw symmetry
To reflect in Photoshop, you need to create symmetry.
How do you draw symmetry in Photoshop?
Use the Flip Vertical function of the Transform tool. This function creates a perfect mirror image of your selection. You’ll then use layer masks to adjust the reflection until it looks realistic.
How to add a layer mask
How do you add a layer mask in Photoshop? You can make layer masks pretty easily by selecting the layer, and then clicking on the Layer Mask icon at the bottom of the Layers panel. We’ll walk through how to create a mask and how to use it to modify your reflection in the tutorial steps below.
How to make a glass reflection in Photoshop
- Enlarge your canvas
- Select your object
- Duplicate and flip your object
- Create perfect symmetry with your reflection
- Add a layer mask
- Clean up shadows
The image of this lens is ideal for a product reflection in Photoshop because the product is viewed head-on, and the base of the lens rests along the horizon line.
Step 1: Enlarge your canvas
Your canvas size needs to be big enough to accommodate your product’s reflection. From the dropdown menu at the top of the application window, choose Image > Canvas Size….
In the dialog box that pops up, click on the anchor arrow pointing directly up (top middle square of the anchor matrix) and set the canvas height to twice its original height.

Step 2: Select your object
In this particular image, the picture has a white background. However, we don’t want to reflect the shadow, only the object. To do so, use the Magic Wand tool (located in the Toolbar on the left-hand side of the application window) and choose Select Subject. Photoshop will create a selection of your product.

If you need to make a more refined selection, check out the tutorial on using the Magic Wand tool.
Step 3: Duplicate and flip your object
With your product still selected, copy your object by typing CTRL+C (COMMAND+C on a Mac). Then paste the product by typing CTRL+V (COMMAND+V on a Mac). The isolated product should automatically appear in a new layer.
Select your new layer and duplicate it by choosing Layers > Duplicate Layer… from the dropdown menu at the top of the application window.
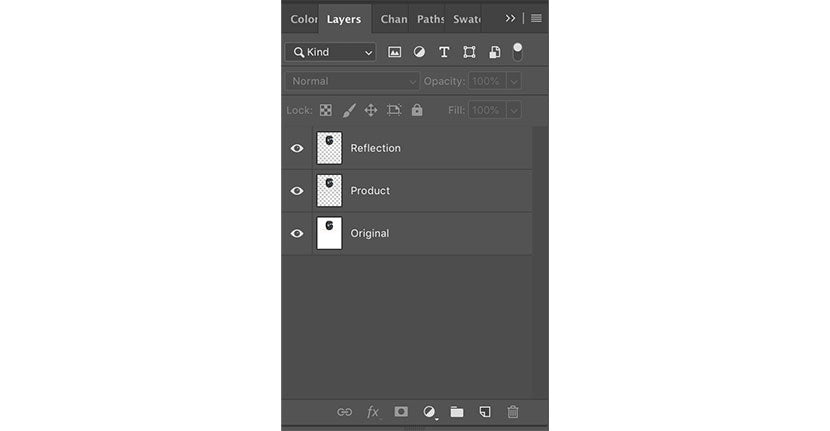
Rename your lowest layer “Original.” Rename your Layer 1 “Reflection,” and rename your Layer 1 copy “Product.” Make sure that the Reflection layer is below the Product layer in your Layers panel.
For more information about working with layers, see the beginner’s guide to using Layers.
Step 4: Create perfect symmetry with your reflection
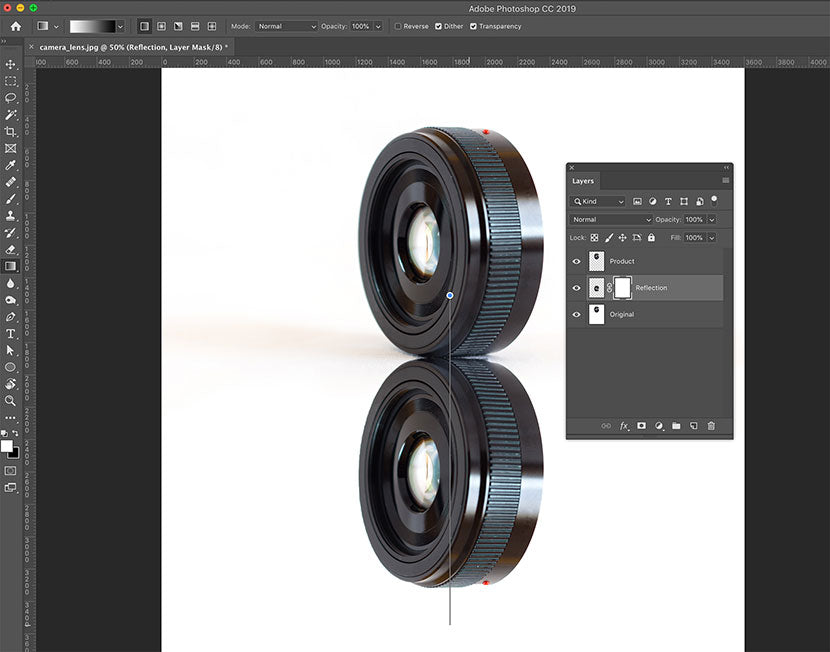
Select your Reflection layer in the Layers panel and choose Edit > Transform > Flip Vertical from the drop-down menu at the top of the application window.

With the Reflection layer still selected, move the flipped product image down to rest just under the product image using the Move tool in the toolbar to the left of the application window. You can grab the image with the tool and pull down while holding SHIFT to keep the image lined up correctly. You can also type the down arrow on your keyboard while holding SHIFT until the image lines up with the product’s baseline. This baseline becomes your horizon.

Step 5: Add a layer mask
Once the product and its reflection are lined up correctly, create a layer mask to make the reflection gradually fade away. To add a layer mask to the Reflection layer, click on the mask icon at the bottom of the Layers panel.

Once your mask is created, make sure you have selected your layer mask (when selected, your layer mask will look like it has a dashed line around it in the Layers panel).
In your Toolbar, set your background color to black and your foreground color to white.

Select the Gradient tool from the toolbar and make sure the gradient is set to white-to-black at the top of the application window.

Make sure you still have your Reflection layer’s mask selected. Starting in the middle of your product, draw a straight line through your image to the bottom of your reflection.
The result will look like a reflection.
To make the reflection look even more realistic, reduce the opacity of your Reflection layer until you like the way it looks. Make sure you’ve selected the layer and not the mask.

Step 6: Clean up shadows
Our image doesn’t quite look right, and it’s because of the shadows from the original image are being cast behind the object. We need to think about how light works with our reflection and how to add drop shadow in Photoshop.
To finalize our reflection, we’ll need to remove all shadows except for the small shadows occurring immediately below the object. You can use a soft paintbrush set to the same color as the background (in this case, white) and gently paint over any shadows that shouldn’t be there in your Original layer.

How do you make a water reflection in Photoshop?
- Set up your canvas
- Create your reflection
- Create a water texture in Photoshop
- Distort Displacement layer
- Create a displacement map
- Apply the displacement map
- Add depth to your water
Add a ripple effect to make the object look like it’s sitting on water. This effect also works well if want to create a reflection of a person in Photoshop — you can make your model appear to be standing in or in front of a body of water.
Step 1: Set up your canvas
If you’re creating a reflection in water, you’ll set up your layers similarly to how you did it for a glass reflection with a few small differences.
Set your foreground color to a dark, watery blue.

Double click on your Background layer to unlock it if it isn’t already unlocked. Name the layer Original.
Adjust your canvas size so that your image is now double in height. Make sure the Canvas extension color is set to Background. Remember to set the anchor to the top middle quadrant.

Click OK.
Using your Rectangular Marquee tool from the toolbar, draw a selection around the area of your image you wish to reflect.
Choose Select > Inverse from the dropdown menu at the top of the screen or click SHIFT+CTRL+I (SHIFT+COMMAND+I on a Mac) to select the inverse of the selection.

Choose to Edit > Fill or type SHIFT+F5 (FN+SHIFT+F5 on a Mac laptop) to fill the inverse selection with the blue foreground color.

Choose Select > Inverse again from the dropdown menu at the top of the screen or click SHIFT+CTRL+I (SHIFT+COMMAND+I on a Mac) to select the inverse of the selection.
Step 2: Create your reflection
Copy the selected area by typing CTRL+C (COMMAND+C on a Mac), and then paste the selection by typing CTRL+V (COMMAND+V on a Mac). The duplicated selection will automatically appear in a new layer.
Rename the new layer Reflection, then flip the layer vertically as you did above with the reflection in glass by selecting to Edit > Transform > Flip Vertical from the dropdown menu. Move the reflected layer down until its top lines up just a pixel or two below the bottom of the image in the Original layer.

Then, as you did with the glass reflection, add a layer mask to the Reflection layer and paint a black-to-white gradient within the mask. Click onto the Reflection layer and reduce the layer’s opacity to about 80%.

Step 3: Create a water texture in Photoshop
In your document, create a new layer by selecting Layer > New > Layer... or typing SHIFT+CTRL+N (SHIFT+COMMAND+N on a Mac).
Name your new layer Displacement, and move it to the top of your Layers panel.
Fill the layer with white by selecting Edit > Fill from the drop-down menu or clicking SHIFT+F5 (FN+SHIFT+F5 on a Mac laptop) and choosing White next to Contents in the dialog box.

Click OK.
Select Filter > Noise > Add Noise… from the dropdown menu at the top of the application window.
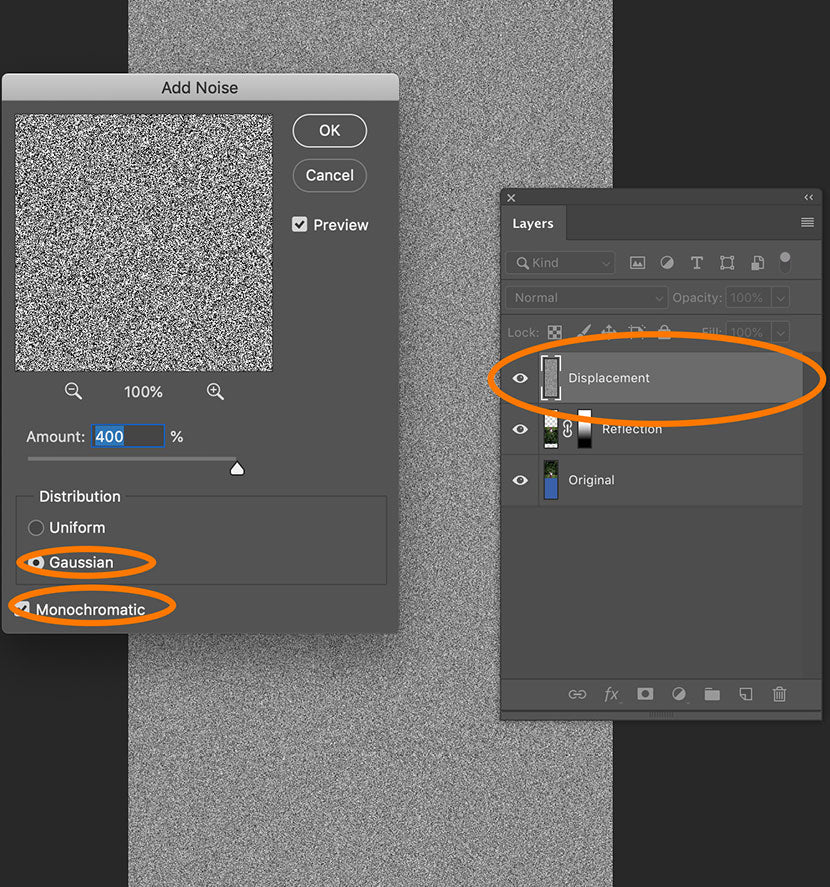
In the Noise window, move the slider all the way to the right (400%). Select Gaussian under Distribution and make sure Monochromatic is checked.
Click OK.
Select Filter > Pixelate > Crystallize… from the drop-down menu at the top of the application window. In the dialog box, move the slider until the “crystals” are about the size of the ones in the image below.

Click OK.
Select Filter > Blur > Motion Blur... from the dropdown menu and set the angle to 0 degrees. Adjust the slider until the blur starts to look like actual water ripples.
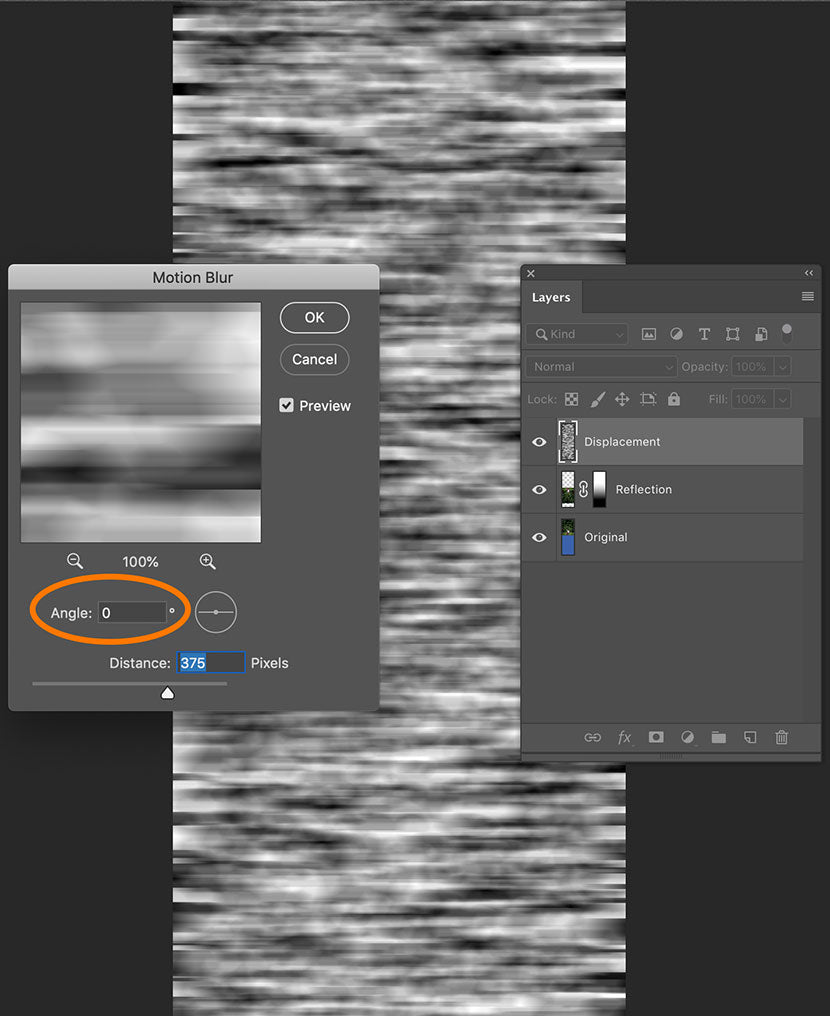
Click OK.
Step 4: Distort Displacement layer
Zoom out of your document until it’s thumbnail size.
Click on the Displacement layer and select all contents of the layer by choosing Select > All from the drop-down menu or typing CTRL+A (COMMAND+A on a Mac).
Choose Edit > Transform > Perspective from the dropdown menu. Grab the lower left corner of your document and drag to the right until you’ve achieved significant perspective.

Click on any tool in the Toolbar to make the change take effect (Click OK if a dialog box pops up).
Choose Edit > Transform > Distort from the dropdown menu. Grab the top of the layer and pull it down until it lines up with the top of the reflection layer (in other words, line it up with the horizon of the image).
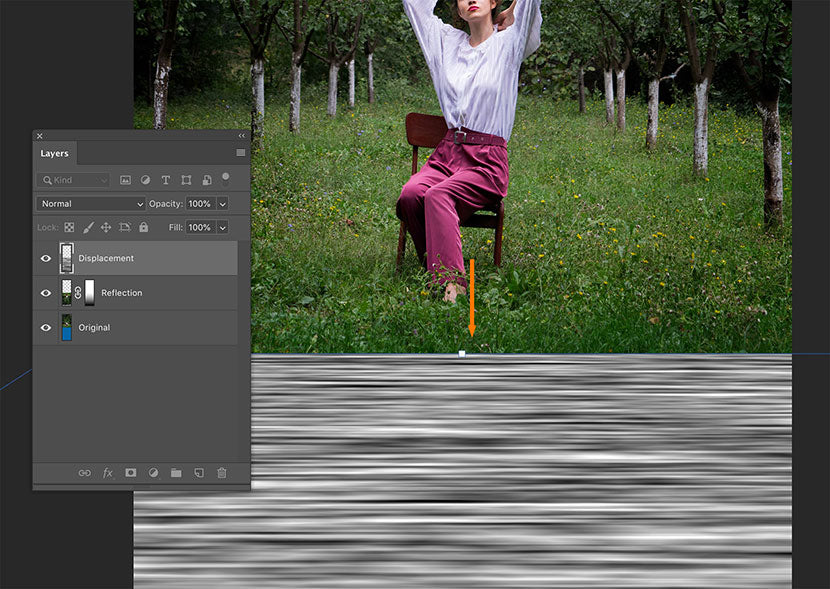
Click on any tool in the Toolbar to make the change take effect (Click OK if a dialog box pops up).
Step 5: Create a displacement map
Hide all layers except your Displacement layer by clicking on the eye icon next to the layers.
Choose Select > All or click CTRL+A (COMMAND+A on a Mac) from the dropdown menu to select all of the layer.
Choose Image > Crop from the dropdown menu. This will remove any extra “stuff” that exists outside the artboard frame (otherwise, your displacement map may not line up correctly when you apply it).
Choose File > Save As… from the dropdown menu or click SHIFT+CTRL+S (SHIFT+COMMAND+S) to pull up the Save As… dialog box. Save your document as Displacement_Map with a .PSD extension in a place you can easily find again.
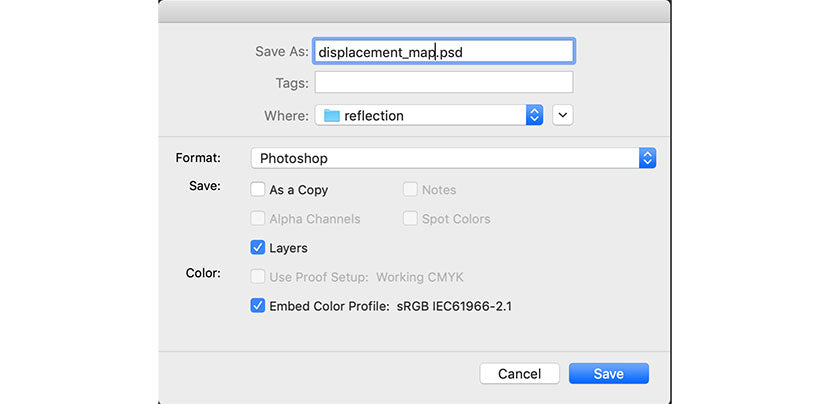
Click OK.
Step 6: Apply the displacement map
Hide the Displacement layer and make the Original and Reflection layers visible. Select the Reflection layer in your Layers panel.
Choose Filter > Distort > Displace... from the dropdown menu.

In the dialog box, set your Horizontal Scale to a value above 10. You may have to experiment to find what looks best; the higher the value, the more prominent your “ripples” will be. Set the Vertical Scale to 0. Make sure Stretch to Fit and Repeat Edge Pixels are selected.

Click OK.
A browse window will pop up on your screen. Choose the image you just saved as your displacement map, and click Open.
You should now have a ripple effect applied to your reflection
Step 7: Add depth to your water
Drag your hidden Displacement layer down until it’s just below the Reflection layer, and click on the eye icon next to the layer to make it visible again.
Set your Displacement layer’s blend mode to Overlay.

You can then adjust the opacity of the layer until you are satisfied with the results.

Ready to sharpen your Photoshop skills? Check out these free tutorials.