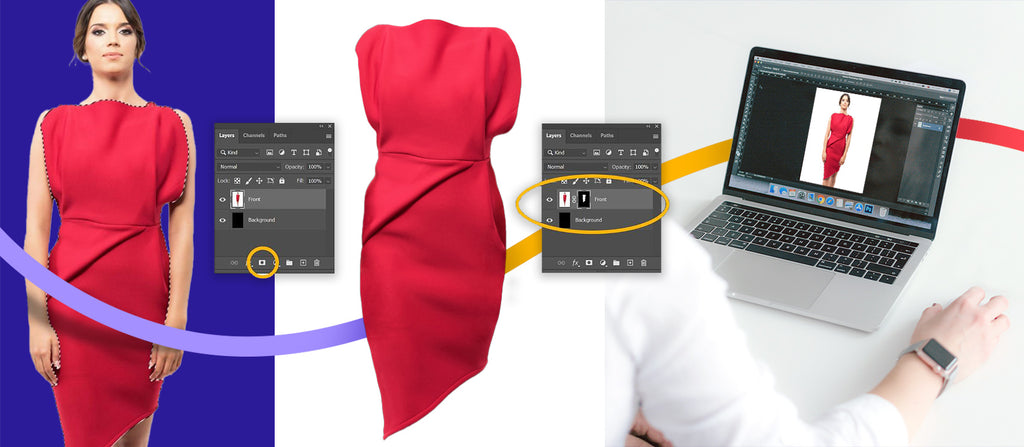
Ghost mannequins create a great effect when you want to show off both the front and interior of a garment—as if the clothing were placed on an invisible mannequin. By following the steps below and employing a little artistic skill, you can learn how to create your own invisible mannequin in Photoshop.
This particular ghost mannequin application also allows you to set your image on any color background.
How to create a ghost mannequin in Photoshop: the step-by-step tutorial
For this ghost mannequin tutorial, we’ll use the following photos for our garment front and interior, and show you how to use the ghost mannequin technique to merge them together.

Scroll down below for the full written tutorial.
1. Set up your layers
Open the image of the garment shot on a mannequin or model in Photoshop and double-click on the Background layer to make the layer editable. Rename the layer “Front.”
Create a new layer and place it behind the Front layer. Name the layer “Background.” Then, fill the new Background layer with 100% black by typing SHIFT+F5 (FN+SHIFT+F5 on a Mac laptop) and choosing Black next to Contents.
Note: If you’re working with a black garment, set the background color to 100% white.

Creating a black background will help you see your selection accurately as you create it. We’ll change this background color later as needed.
2. Select the background using the Magic Wand tool
Make sure the Front layer in your Layers panel is selected.
Select the Magic Wand tool from Photoshop’s toolbar or press W on your keyboard.
If you don’t see the Magic Wand tool, it may be hiding behind the Object Selection tool or the Quick Selection tool. Click and hold on whichever of these selection tools is visible to reveal and select the Magic Wand tool.

With the Magic Wand tool selected, you’ll see two buttons at the top of the application window in the options bar: Select Subject and Select and Mask... Click on Select and Mask...

If you get an error message saying nothing could be selected, make sure you’re on the Front layer.
A Preview Window will appear, and what you see in that window depends on the View Mode selected under Properties on the right side of the screen.
Make sure View is set to On Layers (Y).

Click on the Select Subject button at the top of the screen.

Photoshop will attempt to figure out the subject of your photograph and then create a selection accordingly. If your original photograph has a solid background that’s a different color from your garment, this selection will be close to perfect.
On the left-hand side of the Preview Window are tools you can use to help you work with the selection.

If you need to refine the selection (such as the edge on the left-hand side of the dress in the image above), you can paint along the edge of the selection using the Refine Edge Brush tool or the Brush tool on the left-hand side of the Preview Window.
See the tutorial on the Magic Wand tool for a detailed explanation of Select and Mask...
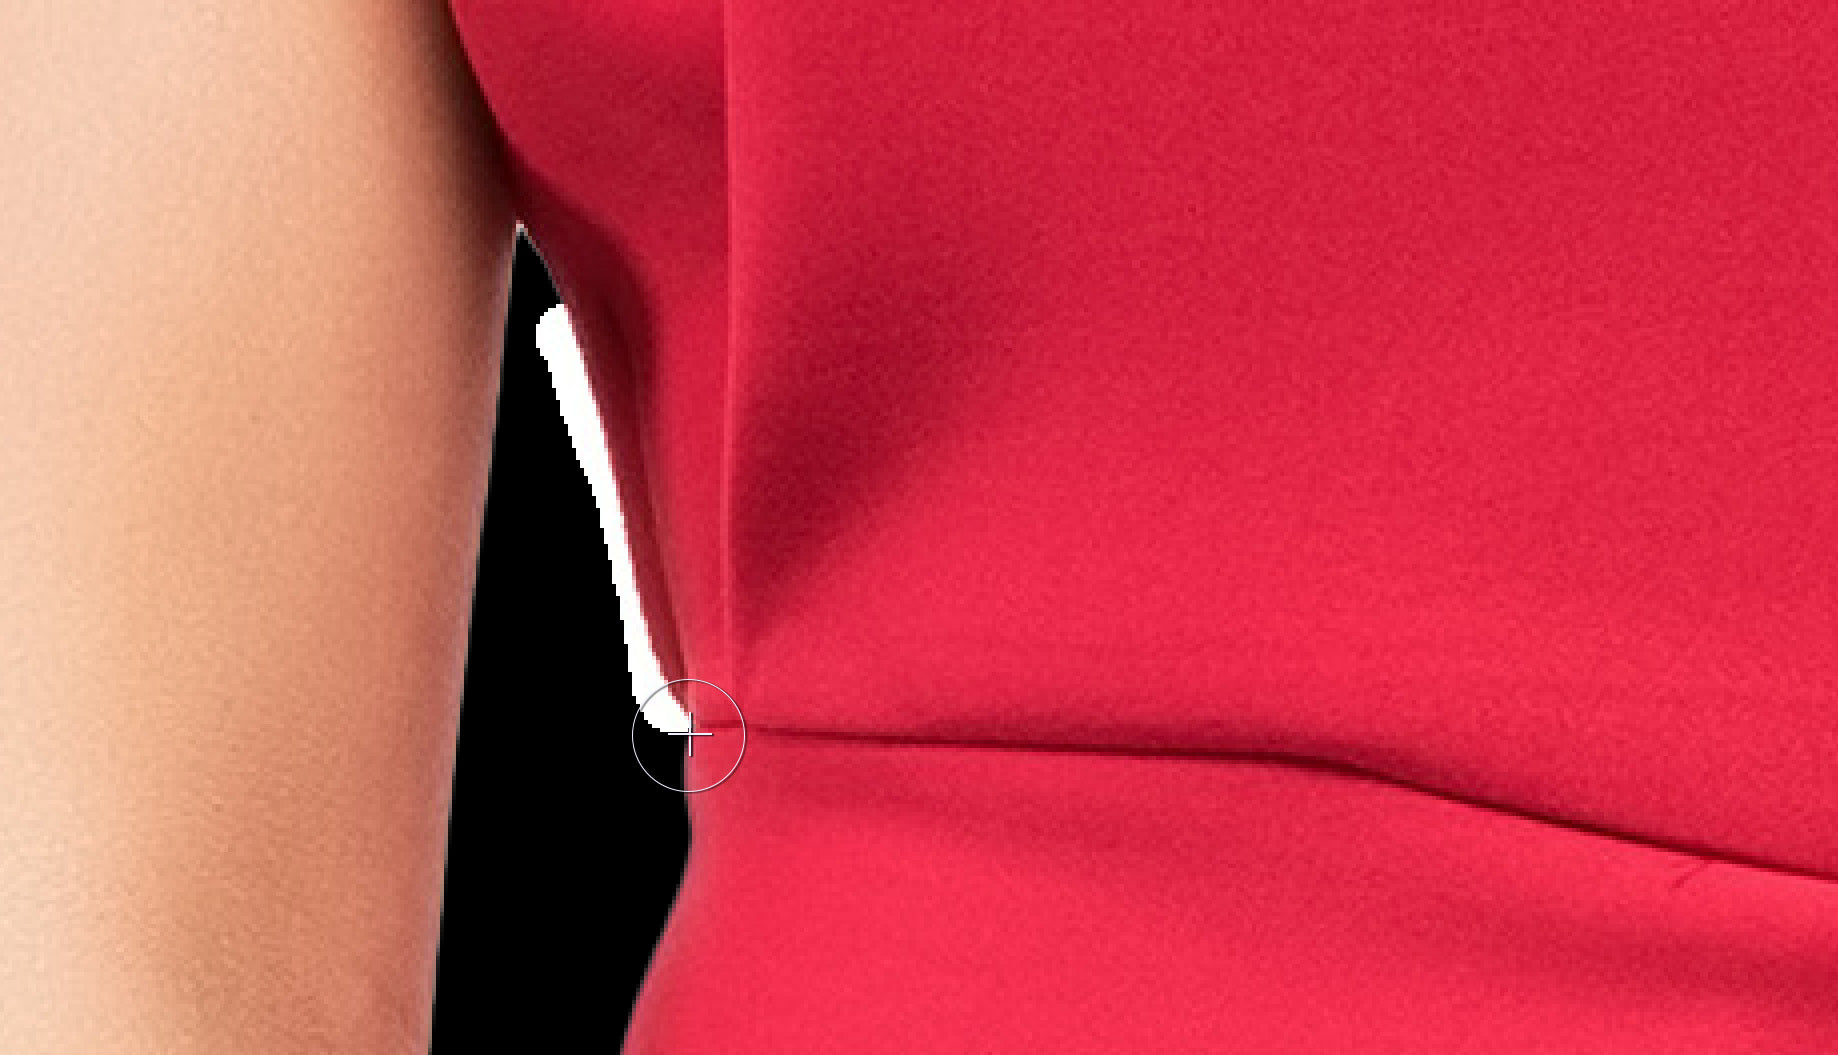
3. Select the mannequin using the Magic Wand tool
The next step is to remove the clothing from the mannequin in Photoshop.
Select the Quick Selection tool, then choose Subtract from the options bar at the top of the Preview Window. Add and Subtract look like dashed ellipses surrounding “plus” (+) and “minus” (-) signs.
Select areas of the mannequin that are still showing by clicking on them in the Preview Window. These areas will disappear from view as you click on them. If you accidentally remove part of the garment as well, type CTRL+Z (COMMAND+Z on a Mac) to undo, and then reduce the “Size” option next to the selection tool.

The selection doesn’t need to be perfect, but it does need to be refined enough for you to feel confident removing any additional pixels from the image using your Eraser tool.
On the right-hand side of the Preview Window, move the slider for Shift Edge to the left, about 30%. This will move the selection inward slightly, helping remove any halo effects from the selection.

Click OK.
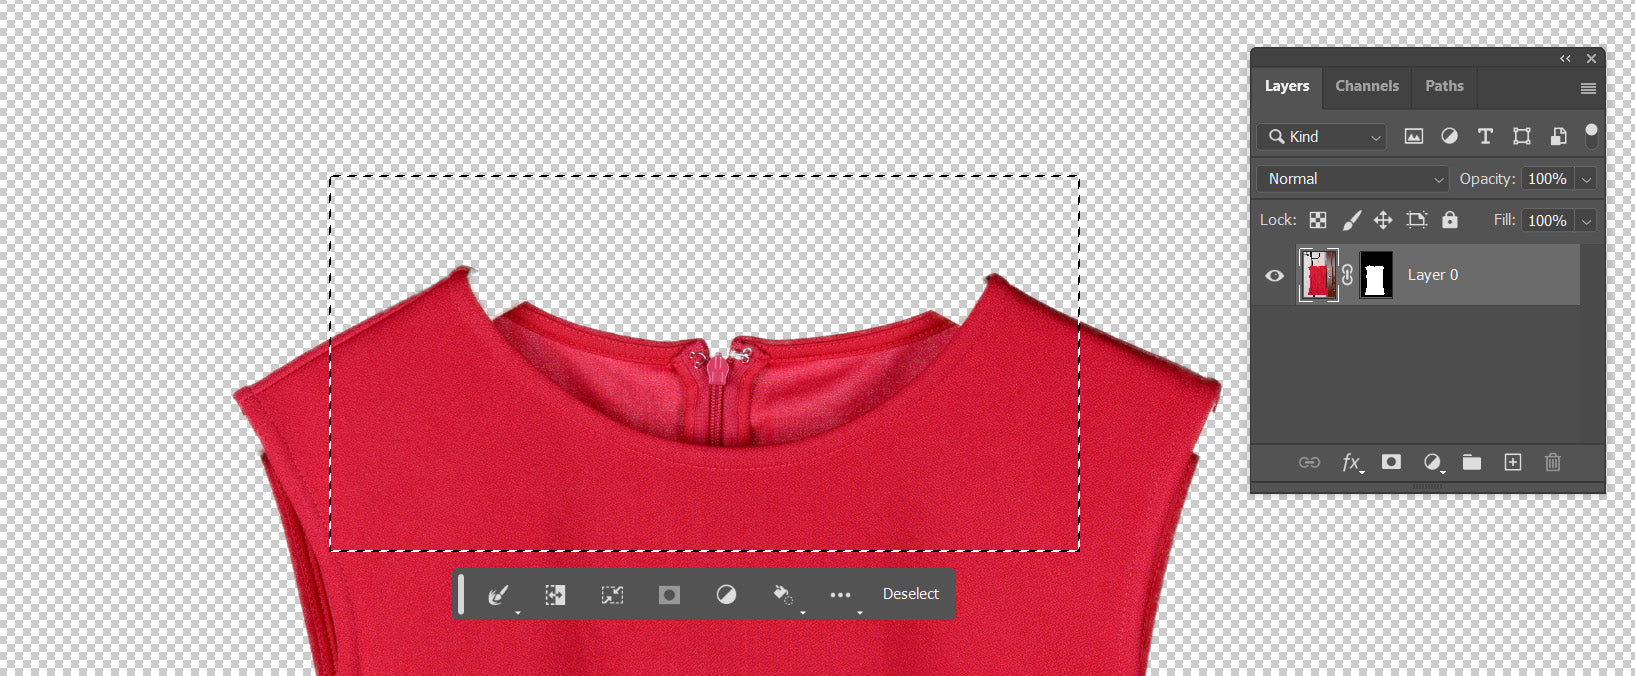
4. Create Layer Mask
In your Front layer, click on the mask icon at the bottom of the Layers panel to mask out the subject’s background. Then, select the mask icon next to the Front layer icon.

Choose the Eraser tool from the Toolbar and make sure the foreground color is set to white and the background color is set to black.
Erase out any portions of the mannequin that are still visible.

With the image we’re using, the model’s arms cover part of her skirt. We’ll need to use the Clone Stamp tool to “paint back” portions of her skirt.
To learn more about the Clone Stamp tool, check out this article on Photoshop tools.

After “repairing” sections of the skirt covered by the model’s arms, you’re ready for the second stage of the ghost mannequin Photoshop tutorial.
5. Create selections of the interior
It’s time to break out that second image—the one that shows the interior of your garment (such as the neck).
Repeat Steps 2 and 3 with the interior photograph so you have a selection of the garment itself, and then create the layer mask.

Using the Rectangular Marquee tool, select the neck area of the garment. Type SHIFT+CTRL+C (SHIFT+COMMAND+C on a Mac) to copy the selection and the mask.
In your Front image, select the Background layer and type CTRL+V (COMMAND+V on a Mac) to paste the selection. Name the layer “Neck.”

Type CTRL+T (COMMAND+T on a Mac) to scale or rotate your neck layer so the back of the neck lines up with the front of the neck and shoulders.

Repeat the process with any other portions of the garment where the back of the garment should show.
6. Warp and clean up interior portions
This is the step that separates a good Photoshop ghost mannequin from a great Photoshop ghost mannequin.
Remember, the photo you had that you grabbed your garment’s interior from lay flat, but you want those portions to look just as filled out as the front of your garment. You can use the Warp transform tool to do the trick.
Make sure you have the layer selected that you want to warp (we’ll start with the neck in this example). Choose Edit > Transform > Warp to enable the Warp tool.
Pull up on the center of the neck with the Warp anchors to form a curve, as an actual neck would form. You can also use the tool to adjust any other discrepancies you see.

Once you’ve adjusted the curve of the garment, use the Eraser tool to gently remove any areas that don’t line up completely with the top edge of the neck.
Repeat the process with other areas of the garment where the interior shows.
7. Darken interiors
In order to finalize the illusion that this photo was taken on an invisible mannequin, you need to add drop shadows to the interior portions of the garment.
Select the Neck layer in the Layers panel. Choose the Burn tool from the Toolbar. If you don’t see the Burn tool, it might be hiding behind the Dodge tool or the Sponge tool.

Once the Burn tool is selected, you have several options in the Options bar for what you want to darken—highlights, midtones, or shadows. Use your judgment over which of these options best suits the color of your garment. Then, “paint” with the burn tool over the areas of your garment’s neck that would be in shadow.

Repeat the Burn tool adjustments on any other layers where interior portions show.
8. Get the background color you want
You’re almost done! Go back to your Background layer and change its color to white or whatever other color you prefer. Since you used black when you created your selection, you can be confident that your ghost mannequin will look good in front of any color.

Getting the best photographs to work with
The better the source material, the easier it’ll be to create your ghost mannequin in Photoshop. While some sellers have actual invisible mannequins to use for their product photography, many rely on regular mannequins or models and the technique described in this tutorial.
To ensure you have the best photos to work from, do the following during your photo shoot:
Shoot clothing items on a symmetrical mannequin, arms pointing down.
- If you’re using a model instead of a mannequin, make sure their arms hang down and their legs are uncrossed. Also, clip back long hair or jewelry that could obscure the actual clothing product.
- Keep camera and lighting in the same place when shooting clothing interiors. Clip your clothing item to a piece of whiteboard or foam core, then stand the board up at the same location and height as the mannequin to ensure consistent lighting.
- Keep backdrops neutral and plain. A plain white or light gray, non-reflective backdrop is best. Our analysis of the top online clothing brands found that more than 94% of those brands have a plain, neutral background.
- Iron or steam clothes prior to shooting, and make sure garments fit on the mannequin properly — without folds or gaps.
- Place your camera at the same height as the product. In other words, don’t have the camera above the item, looking down. Shooting with the camera at the wrong angle will distort the product and require more post-processing work.
Make the most of your product photos
In an ideal world, you’d have complete control over your clothing photography. However, you can still create an invisible mannequin effect in Photoshop with less than perfect source materials.
Not enough time to figure it all out yourself? Send your photos to us, and we'll whip up a professionally edited photo with a ghost mannequin in no time — and for less than 50 cents an image.
Ghost mannequin Photoshop FAQs
How do you do the ghost mannequin effect?
You can use the ghost mannequin effect on any garment that has been photographed on a model or a mannequin. Use the ghost mannequin effect to showcase garments without the distraction of a model or a visible mannequin in your ecommerce photos.
Why use ghost mannequin?
Using a ghost mannequin can help your customers understand what a garment will look like when it’s being worn. Ghost mannequins provide a more accurate understanding of how a garment will fit than garments photographed on a hanger.
What is the mannequin effect in Photoshop?
The mannequin effect in Photoshop is a technique that allows you to remove all visible signs of a person or a physical mannequin from your photo using a series of Photoshop tools. The end result looks like the garment is being worn by someone invisible, such as a ghost.
What is an invisible mannequin?
An invisible mannequin is the same as a ghost mannequin. Invisible mannequin photography gives the illusion of a garment being worn and shows how the garment will fit a person. However, in an invisible mannequin ecommerce photo, the model or mannequin is rendered fully invisible.
How do you take ghost mannequin photography?
- Photograph the garment on a model or mannequin against a white background if possible.
- Lay the garment flat on a white surface and take photos of the interior portions of the garment that are visible on a hanger.
- Using the steps in this tutorial, carefully remove the model or mannequin from the photo, and stitch that photo with photos of the interior.