

For any ecommerce retailer, photographer or marketing professional, knowing how to remove the background from your photos is a skill you’ll use countless times. This step-by-step tutorial will show you how to remove hair from a solid background.
Receive free ecommerce & product photography tips
It can be incredibly frustrating to move the background from hair if you don’t understand some of Photoshop’s unique eraser tools. Trying to remove the hair from a background can be time consuming and end up ruining your original image if done incorrectly. In this Photoshop tutorial, you’ll walk away knowing how to remove a background from hair with the Background Eraser Tool. Once you have mastered how to remove the background from hair in Photoshop 2021, you’ll be able to tackle any photo or image.
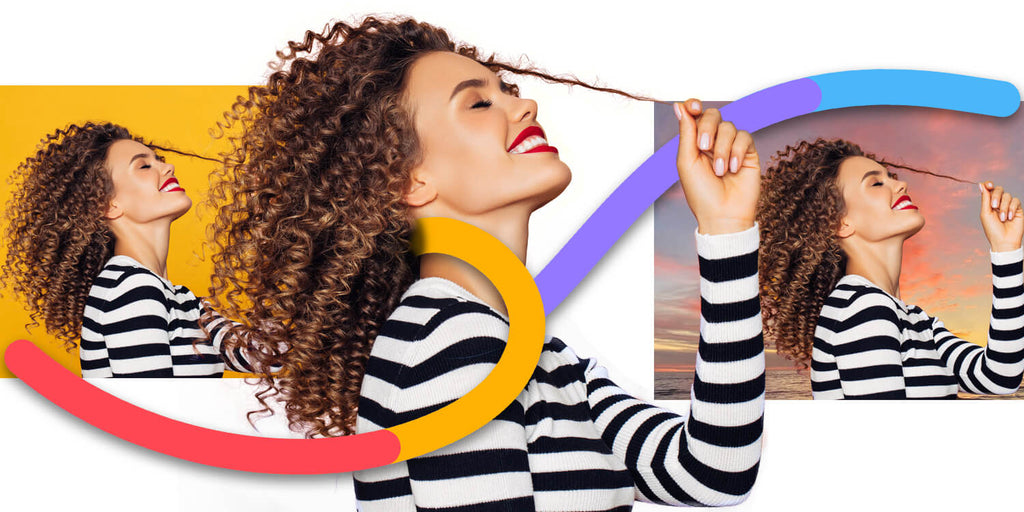
We’ll be using an image that shows you how to remove the background from curly hair in Photoshop, but these directions will work with any type of hair.
Step 1: Set up your layers
Open the image you want to remove the background from in Photoshop 2021. Get to your Layers panel by selecting Window > Layers or by clicking on the Layers panel icon to the right of the screen.

Make sure the locked Background layer is selected (it should be selected by default). Open the Layers panel menu by clicking on the three little lines in the upper left-hand corner of the panel. From the menu that drops down, choose Duplicate Layer.
Pro tip: We create a duplicate layer so you can preserve the original image. This gives you a backup of the original in case you make a mistake or need to start over.

In the pop-up box, click OK to create the Background copy layer.
Step 2: Create a high contrast layer
Click on the plus sign at the bottom of the Layers panel to create a new layer.

In your Toolbar, doubleclick on the Foreground color to bring up the Colors dialog box. Using the color sliders, choose a color that’s in high contrast to the background color of your original image. Since our image has a yellow background, we’ll choose a bright blue.
You want to use a bright, high contrast color to work with as you remove hair from the background in Photoshop so you can easily see how much of the background is actually being removed as you work.

Once you’ve chosen your color, select your new layer and choose Edit > Fill from the dropdown menu at the top of the application window, or click SHIFT+F5 (FN+SHIFT+F5 on a Mac). In the dialog box that appears, choose Foreground color at 100%.

Once you’ve filled your new layer with the Foreground color, move that layer between your Background copy and Background layers in the Layers panel. You can do this by grabbing the new layer and dragging it until it pops into place between the Background layers.

Step 3: Remove the background around the hair and model
Select the Background Eraser Tool from the Toolbar. It may be hidden behind the Eraser Tool.

Next, select the Background Color from the Toolbar and select the image’s background color using the Color Picker in the pop up dialog box.

With the Background Eraser Tool selected, you’ll notice three little buttons in the Options Bar at the top of the application window next to the brush size. These determine how the background will be sampled: Contiguous, Once, or using a Background Swatch. Since the original image has a solid background, choose the third option: Background Swatch.
Make sure Discontiguous and Protect Foreground Color are selected. These settings ensure the top layer will remain separate from the bright blue background layer as you edit and remove hair from the background in Photoshop.

You’ll also see two other options in this Options Bar: the Brush Preset (set to 13 in the image above) and Tolerance. Begin with a brush size that makes sense for the image you are working with, and start with Tolerance set to 50%.
Go back into your Layers panel and make sure your top layer, Background copy, is selected.

Now, with your Background Eraser Tool, begin erasing the area around the hair.

As you work, you may need to adjust the Tolerance level up or down depending on the colors in the foreground image. For instance, there are a lot of yellow tones in the model’s skin which could be accidentally erased using a high Tolerance level; therefore, we’ll reduce the Tolerance down to about 20% while working around the face and hands. You may also find it’s helpful to reduce the brush size when working in these areas as well so you have more precision over the areas being removed.
Continue erasing until you have an “outline” around your entire subject.

Once you’ve erased the area immediately around your subject, you can increase your brush size and your Tolerance and remove the remainder of the background.

Step 4: Replace the background
Go back into your Layers panel and hide the bright color layer and the original Background layer by clicking on the Eye icon next to each layer.

You now have a transparent background, and you can insert any background you wish into the image. Or you can copy this image and paste it into another image.
Now that you’ve learned how to remove the background from hair in Photoshop, you can substitute your original backgrounds with your individual brand colors or with more complex backgrounds, adding interest and continuity to your ecommerce photography.

Master more Photoshop skills
You can improve your photo-editing skills with our library of Photoshop tutorials that will help you create perfectly edited images to promote your products. Browse some of our most popular Photoshop tutorials:
- How to Change the Background Color of a Picture
- How to Make Someone Smile in Photoshop: A Tutorial for Brands
- Blur the Background in Photoshop: A Tutorial for Your Product Photos
FAQs about removing background from hair in Photoshop
How do I remove background from hair in Photoshop?
You remove the background from hair in Photoshop using the steps in this post:
- Set up your layers
- Create a high contrast layer
- Remove the background around the hair and model
- Replace the background
How can I change my hair background?
You can change your hair background by following the steps in this tutorial to remove the background. Then choose a new background color or image to replace it with, or leave it as a transparent background.
How do I remove green screen from hair in Photoshop?
If you need to know how to fix hair that is in front of a green screen, you can use a similar method as described above, with just a few extra steps. First, set up your layers and use the Background Eraser Tool, this time with a red background.

Because green screens are very bright, a greenish hue often ends up in the hair. To counteract this, you can increase the tolerance of the Background Eraser Tool as you erase around just the edges of the hair. If that does not work to your satisfaction, after erasing as much as you can, create a rough selection around the areas in the photo where you see the color green.
Then, choose Select > Color Range from the application drop-down menu to capture just the greenish pixels within your rough selection. You then can use whatever color adjustment tool you prefer (such as Hue/Saturation or Color Balance) to fine-tune the colors in that selection.


![How to Create a Clipping Path in Photoshop [Updated for 2022]](http://pathedits.com/cdn/shop/articles/image14.jpg?v=1639448433 "How to Create a Clipping Path in Photoshop [Updated for 2022]")


